
This is a walkthrough-lab, with some inspiration taken from a real world situation. We were in need of replacing a printer in the network: But I did not get the chance to do it in the production network, so I created this lab to test it out in the Devnet Sandbox environment. This was a great opportunity to test the integration between ISE and Catalyst Center, and to see how MAB works in a real world scenario.
Replace printer in Catalyst Center with MAB
Lab Overview
The printer that will be added will be named Printer1. The task was to ensure that the new printer would be authenticated via MAB and placed in the correct VLAN (VLAN 30 for printers) in the network, and that this information would be visible in Catalyst Center. The lab is designed to simulate the process of adding a printer to a network that uses Cisco Identity Services Engine (ISE) for authentication and Cisco Catalyst Center for network management and visibility. Since both ISE and Catalyst Center is located outside of my regular homelab this lab will be more of a walkthrough that a hands-on lab that will test your capabilities. Still, just follow the steps and you will be able to complete the lab and learn how to MAB a printer in ISE with the help of Catalyst Center, and how to verify that the printer is authenticated and placed in the correct VLAN in Catalyst Center.
Want more labs?
You will find all the labs in the Bitsize series on my Github, link to repo: CML-bitsize-labs.
Learning Objectives
- Identify client devices at the switch level
- Understand MAC address tables and authentication sessions
- Familiarize yourself with Catalyst Center and ISE
- Manage endpoints in Cisco ISE
- Create and apply ISE authorization policies
- Assign VLANs via MAB
- Troubleshoot the end-to-end NAC flow
Lab Instructions
Prerequisites:
- Basic understanding of Cisco ISE and Catalyst Center
- An account on the Devnet Sandbox and access to the “Identity Services Engine 3.4” and “Catalyst Center Sandbox” or “Catalyst Center Always On” sandboxes.
Setup: Sign in to the Devnet Sandbox start page and reserve/launch the “Identity Services Engine 3.4” and the “Catalyst Center Sandbox” sandbox. Once the sandboxes is up and running and accessible, access the Catalyst Center GUI and the ISE GUI using the provided credentials. If you are using Windows you need to use AnyConnect client to connect to the VPN to access the sandbox.
Configuration: Follow the instructions in the Lab Tasks to configure ISE and Catalyst Center. Use the CLI to apply the necessary commands and verify your configuration.
Lab Tasks
-
Identify the Networks: Familiarize yourself with ISE and Catalyst Center in the devnet sandbox. The MAC address of printer1 is 1111.1111.1111, and it is connected to the switch port Gi1/0/12.
-
Configure ISE: Create the necessary groups, endpoints, and authorization policies in ISE to allow the printer to authenticate via MAB and be placed in VLAN 30.
-
Configure and Verify Catalyst Center: Configure Catalyst Center to check the printer’s authentication and VLAN assignment. Verify that Catalyst Center is properly integrated with ISE and that it can see the printer’s authentication status and VLAN assignment.
Walkthrough
This is a walkthrough of the lab, where you can find the commands and steps to complete the lab tasks.
### Identify the Networks Sign up to the Devnet Sandbox and review the lab topology to understand the network setup. Identify the switches, printers, and the ISE server that will be involved in the lab.
Look up the mac address of printer1: Access the switch that the printer is connected to, you can find the switch in the inventory of Catalyst Center, and use the Run Command feature to find the MAC address of printer1. To find the Inventory go to the main menu of Catalyst Center → Provisioning → Inventory. In the Command Runner, input the following command: show mac address-table and locate the MAC address of printer1. The output will be something like this:
          Mac Address Table
-------------------------------------------
Vlan    Mac Address       Type        Ports
----    -----------       --------    -----
      1111.1111.1111    DYNAMIC     Gi1/0/12
Configure ISE:
Log in to the ISE GUI with your browser and sign in with the provided credentials given in an email sent from your friends at Cisco.
Create MAB Group: First you need to create a group for the printers in ISE, this will help you to apply specific policies for the printers. Navigate to Administration → Identity Management → Groups → Add. Create a group named “Printers” and save it.

Create Endpoint:
Next, you need to create an endpoint for the printer in ISE. This will allow you to manage the printer’s authentication and authorization policies.
We already have the MAC address of printer1, so we will use that to create the endpoint.
Navigate to Context Visibility → Endpoints → Add. Create an endpoint with the following details:
mac address: 1111.1111.1111
Static Group Assignment: Printers
 Save the endpoint.
Create Dynamic VLAN Profile: Now you need to create a dynamic VLAN profile that will assign the printer to VLAN 30 when it authenticates via MAB. Navigate to Policy → Results → Authorization → Authorization Profiles → Add. Create an authorization profile with the following details: Name: Permit_VLAN_30 Common Tasks → VLAN: → ID/name: 30 Save the profile.

Create new Policy Set: Add a new Policy Set for the printer, this will allow you to apply the authorization profile to the printer when it authenticates. Navigate to Policy → Policy Sets → Add.
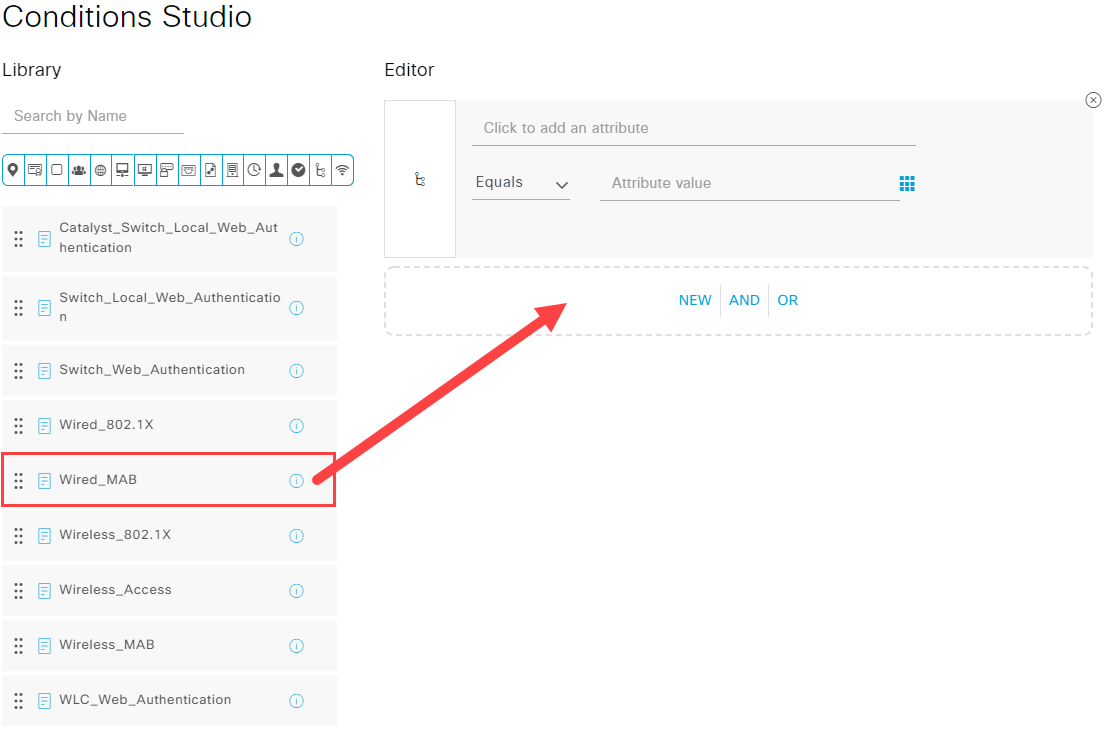
Name the policy set “Printer Policy Set” and click on the plus icon in the Conditions field to add a new condition.
This will open the Conditions Studio. Drag the Wired_MAB condition from the Library to the new under the Editor section. Now save.
Now you will get back to the Policy Set page, giving you an overview of the newly created Policy Set. Make sure that Default Network Access is used in the Allowed Protocols / Server Sequence column. Save that as well.
A check will be preformed to verify that the policy set is valid.

Continue in the Policy Set page, click on the arrow to the right of the Printer Policy Set (under the Vew column) to open the policy set. Under the Authorization Policy tab, create a new rule by clicking on the plus icon. Name the rule “Printer MAB Rule” and click on the plus icon in the Conditions field to add a new condition. In the Conditions Studio, in the Editor section, click on “Click to add an attribute” and click on “Identity Group” and select “IdentityGroupe” with attribute “Name”. On it check so it is marked as “Equals” and pick the value “Endpoint Identity Groupe:Printers”. Click on Use. Now you will get back to the Authorization Policy page. Next to the Conditions field click on Select from list in the profile column. Select the “Permit_VLAN_30” profile that we created earlier and click on Use. Now save the rule and the policy set.
We also have to ensure that the Authentication Policy is properly configured to allow MAB authentication. Navigate to the Authentication Policy tab in the same policy set and ensure that there is a rule that allows MAB authentication for wired devices. If there isn’t, create a new rule that allows MAB authentication for wired devices. The role should look something like this: Identity Group equals Printer Policy Set: Default Network Access: Wired_MAB.
Configure Catalyst Center:
Verify ISE Integration: Before we can verify the printer’s authentication and VLAN assignment in Catalyst Center, we need to ensure that Catalyst Center is properly integrated with ISE. This involves checking the connection status and ensuring that endpoint synchronization is enabled. Navigate to System → Settings → External Services → Authentication and Policy Servers in Catalyst Center. Here you should see the ISE server listed with a status of “Connected”. If it is not connected, you may need to troubleshoot the connection between Catalyst Center and ISE.
Verify Port Configuration: Navigate to Provisioning → Inventory in Catalyst Center and locate the switch and port that the printer is connected to (Gi1/0/12). Check the port configuration to ensure that it is set to allow MAB authentication and that it is not statically assigned to a different VLAN. It should look something like this:
Port: Gi1/0/12
Admin State: Up
Operational State: Connected
Access Mode: Access
Authentication: MAB
VLAN: 30 (after authentication)
Visualize the Authentication Status: Navigate to Assurance → Health → Clients in Catalyst Center. Here you should see the printer listed as a client device. Click on the printer’s entry to view detailed information about its authentication status, VLAN assignment, and the switch port it is connected to.
Test Connectivity:
In a real world scenario, you would now connect the printer to the network and verify that it authenticates via MAB and is placed in VLAN 30. You can use the Catalyst Center GUI to check the client’s status and ensure that it is correctly authenticated and assigned to the right VLAN. Ping the printer from another device in the same VLAN can also be used to verify connectivity.
The End
That’s it for this lab! You have successfully replaced a printer in the network using MAB authentication and used Catalyst Center to manage the configuration. If this was helpful in any way or even the slightest bit interesting, I’m a sucker for feedback, so please let me know if you have any suggestions or improvements. Please reach me on Github or Linkedin.