
This is the first post in the series of posts about my enterprise lab, this post will cover the overview of the lab, the design decisions I made, and the goals I have for this lab. I want to share my knowledge and experience with others who are interested in learning about enterprise network design and configuration, and I hope that this lab will be a valuable resource for anyone looking to enhance their networking skills. If you are a network engineer, a student, or just someone interested in learning about enterprise networks, this lab is for you.
LAB OVERVIEW and DESIGN DECISIONS
Find the github repository for the lab files here
What is this lab about? And why should you care?
This lab is about designing and configuring an enterprise network using Cisco Modeling Labs (Cisco CML). Cisco CML is a powerful network simulation tool that allows users to create and test network designs in a virtual environment. By simulating a real-world enterprise network environment, users can experiment with various configurations and scenarios without the need for physical hardware, making it an ideal learning tool for those looking to enhance their networking skills.
Throughout this lab I will be sharing my design decisions, the challenges I faced, and the solutions I implemented to overcome those challenges. This lab is not only a learning resource for others but also a personal project for me to test and learn new technologies in a practical setting.
Requirements
You fins the labfiles in the GitHub repository, which includes the topology files, configuration files, and notes for each device in the lab. These files will be updated as I continue to work on the lab and add more devices and configurations.
To follow along with this lab, you will need to have access to Cisco Modeling Labs (Cisco CML with atleast Personal subscription) and a basic understanding of networking concepts, including routing protocols, switching, and network security. Familiarity with OSPF (Open Shortest Path First) will be particularly helpful, as it is the routing protocol used in this lab. Additionally, having some experience with network automation tools like Ansible will be beneficial, as I will be using Ansible for network management and automation in this lab. I will provide explanations to why I chose different technologies and configurations, but having a basic understanding of these concepts will help you get the most out of this lab and enhance your learning experience.
CML is hosted on a Proxmox server, if you want to set up a similar lab, you can follow the instructions in the Proxmox documentation to create a virtual environment for Cisco CML. Once you have Cisco CML set up, you can import the lab topology and configurations that I will be sharing in this series of posts. I would recomend that you have a decent machine to run this lab,with atleast 8 CPU cores and 32 GB RAM as Cisco CML can be resource-intensive, especially when running multiple devices and complex configurations Also make sure to allocate enough of space for the imaes and configurations, I would recommend at least 500 GB of SSD storage for the lab. So in summary, the recommended hardware specifications for running this lab are:
8–16 CPU‑kärnor, 32–64 GB RAM, och 500 GB SSD
If you want an awesome installation guide of CML, you can check out this video Youtube link by 0x2142 - Networking Nonsense, which provides a step-by-step guide to installing Cisco CML on Proxmox.
Goals
My goal with this enterprise lab is to create a comprehensive and practical learning environment for network engineers and students who want to understand the intricacies of enterprise network design and configuration.
The lab will cover a wide range of topics, including routing protocols, switching, security, and network management. Each device in the lab will have its own notes file, which will provide detailed information about its role in the network, its configuration, and any relevant details that may be useful for understanding the lab. I will write these notes in a blogging style to make it easier for users to follow along and grasp the concepts being presented.
The design decision for the lab will be based on a typical enterprise network architecture, which includes edge routers, core routers, distribution switches, access switches, firewalls, and other network devices. The lab will also include various scenarios and configurations to help users understand how to design and configure an enterprise network effectively.
Routers and switches:
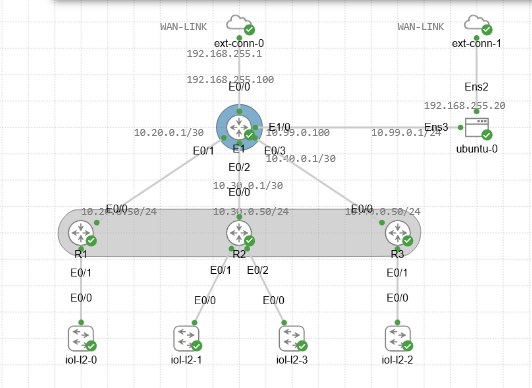
- E1: This is the core router in the lab, which connects to the WAN and serves as the central point for routing traffic between different areas of the network. It will be configured with OSPF as the routing protocol and will have multiple interfaces connecting to the area routers (R1, R2, R3) and a DMZ for management and external access.
- R1: This is an area router that connects to E1 and serves as the gateway for devices in Area 10. It will be configured with OSPF and will have interfaces connecting to E1 and the internal network.
- R2: This is another area router that connects to E1 and serves as the gateway for devices in Area 20. It will also be configured with OSPF and will have interfaces connecting to E1 and the internal network.
- R3: This is the third area router that connects to E1 and serves as the gateway for devices in Area 30. It will be configured with OSPF and will have interfaces connecting to E1 and the internal network.
- Switches: The lab will also include various switches that connect to the area routers and provide connectivity for end devices in the internal network. These switches will be configured with VLANs and other features to simulate a real-world enterprise network environment.
- Firewalls: The lab will include firewalls that provide security for the internal network and the DMZ. These firewalls will be configured with access control lists (ACLs) and other security features to protect the network from external threats while allowing necessary traffic to pass through.
Ip plan:
| Device | Interface | IP Address | Description | OSPF Area | RID |
|---|---|---|---|---|---|
| E1 | Eth0/0 | 192.168.255.100/24 | WAN / Proxmox host NIC | 0 | 1.1.1.1 |
| Eth0/1 | 10.20.0.1/30 | Link to R1 | 10 | ||
| Eth0/2 | 10.30.0.1/30 | Link to R2 | 20 | ||
| Eth0/3 | 10.40.0.1/30 | Link to R3 | 30 | ||
| Eth1/0 | 10.99.0.100/24 | DMZ / Management | — | ||
| R1 | Eth0/0 | 10.20.0.2/30 | Link to E1 | 10 | 10.10.10.10 |
| R2 | Eth0/0 | 10.30.0.2/30 | Link to E1 | 20 | 20.20.20.20 |
| R3 | Eth0/0 | 10.40.0.2/30 | Link to E1 | 30 | 30.30.30.30 |
Design decisions:
- I chose to use OSPF as the routing protocol for this lab because it is widely used in enterprise networks and provides a good balance of features and complexity for learning purposes.
- The lab is designed to simulate a real-world enterprise network, with a core router (E1) that connects to multiple area routers (R1, R2, R3). This design allows users to understand how to configure and manage a hierarchical network architecture.
- The use of a DMZ (Demilitarized Zone) in the lab allows users to understand how to configure security measures and manage traffic between the internal network and external resources. The DMZ will be connected to the core router (E1) and will include hosts that simulate servers and host services that need to be accessible from the outside world while still being protected from direct access to the internal network.
- Its also a playground for me to test and learn new technologies, so I will be adding more devices and configurations as I go along. The lab is designed to be flexible and adaptable, allowing users to experiment with different scenarios and configurations to enhance their learning experience.
Challenges and solutions:
When setting up the I started with the core router (E1) and then added the area routers. An issue i faces right away was to make the routes being visible to each other, which was due to the fact that I forgot to set the OSPF area for the interfaces on E1. Once I set the correct areas for each interface, the routes were visible and the lab was functioning as expected. This highlights the importance of paying attention to details when configuring network devices, as even a small oversight can lead to connectivity issues.
Also setting up the DMZ host to be able to ping the internal and external network was a bit tricky, and I ended up using two interfaces on the DMZ host, one connected to the DMZ network and another connected to the internal network, and then configuring routing on the DMZ host to allow it to communicate with both networks. This was a good learning experience in understanding how to configure routing and connectivity in a complex network environment. This might be something I will change later on, but for now it serves the purpose of allowing the DMZ host to communicate with both the internal and external networks while still being protected from direct access to the internal network.
One of the most important functions of the DMZ is ansible, which will be used for network automation and management. Setting up Ansible to work with the devices in the lab was of high importance, and ensuring easy access and configuration in the lab. installation of Ansible and other tools for management will be described in a later posts, stay tuned for that.
Conclusion
Congratulations on getting through the overview and design decisions of this enterprise lab! I hope this has sparked your interest in learning and following along with the upcoming posts in this series. If you have any questions or suggestions about the lab design, please feel free to reach out to me. I am always open to feedback and ideas for improving the lab and making it a better learning resource for everyone.
Till the next post, happy networking!